I, Robot
Screenshots




Download Details
| split set | irobot.zip 85.02k |
| merged set | irobot.7z 73.69k |
| standalone set | irobot.7z 73.69k |
| artwork | irobot.zip 398.89k |
Game Details
Arcade Video game published 41 years ago:
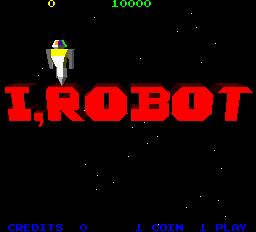
I, Robot (c) 1984 Atari.
I, Robot is a 3-D shoot-em-up in which the player controls the "Unhappy Interface Robot #1984"; a servant robot who has become self-aware and decided to rebel against the all-controlling Big Brother and his ever-watchful 'Evil Eyes'.
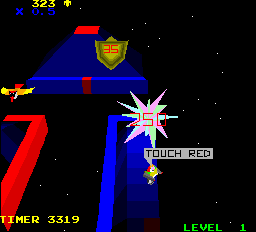
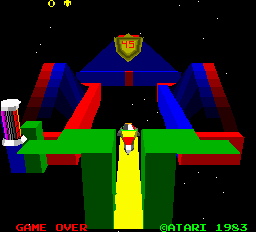
The game is set over a series of platform-based stages constructed from solid coloured blocks and to complete a stage, players must "eliminate the red zones". This is achieved by moving the robot over all of a stage's red surfaces, changing their colour to blue. The colour scheme - including target colour - changes every 26 levels, however. So while the target colour is red for the first 26 screens, it becomes yellow from Level 27, blue from Level 53 and magenta from Level 79.
In order to reach all of the platforms and surfaces, the Interface robot will need to jump. This must be carefully timed, however, as jumping is not allowed under Big Brother's strict regime and his Evil eye - sitting atop a pyramid at the back of the playfield - will open at regular intervals to watch over the interface robot. Should the eye be fully open - indicated by it turning red - when the robot is mid-jump, he will be spotted and destroyed, costing the player a life.
Once all of the coloured squares on a stage have been eliminated, the enemy's shield is destroyed and the Interface Robot will need to be guided to a final, previously inaccessible coloured square at the back of the playfield. The Evil Eye is then zapped and destroyed.
Some levels feature different background elements that affect gameplay, such as walls that must be shot and destroyed to reach coloured tiles, or indestructible moving columns that intermittently block access to coloured tiles, making timing difficult. There are also enemies to be shot or avoided, including birds, bombs and flying sharks.
Once the eye has been beaten, Interface Robot automatically jumps to the top of the pyramid and launches itself into space. A short inter-level "Space Wave" to the next stage follows. These stages feature polygonal objects hurling through space that must be either avoided or destroyed.
Every third level contains a red pyramid that must entered once all coloured squares are eliminated. Once inside, the Robot has one chance to collect as many bonus jewels as possible before destroying the Evil Eye. If the Robot is destroyed while inside the pyramid, he is immediately thrust back into space. The player must then battle through three more levels and destroy a further three Evil Eyes before getting another chance to collect any high scoring pyramid jewels.
After every fourth level, the Space Wave stage features a battle with Big Brother himself, shown as a huge, disembodied polygonal head. Big Brother constantly spits cone-shaped projectiles from his mouth and every single one of these must be shot or they will collide with and kill the player.
The head can be forced to rotate by repeatedly shooting the side of its face. If the head isn't facing the robot, danger is minimized since he won't fire his cone-shaped projectiles when facing away. Players must simply survive this encounter for about 20 seconds, after which Big Brother flies away and the next level begins.
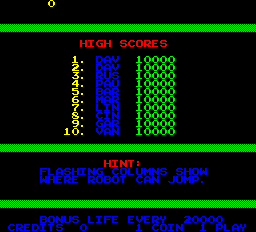
I, Robot features 126 stages, with 26 unique level designs. After level 26, the designs repeat at a higher difficulty level and with an altered colour palette. The on-screen level counter is only two digits, so levels 100–126 are displayed as 0–26 respectively. On passing level 126, the player gets thrown back to a random earlier level.
Once the game is underway, pressing the one-player Start button will incrementally zooms the game's camera closer in to the action, while the two-player Start button pulls it further back, offering new viewing angles of the playfield. Closer camera angles result in higher score multipliers, due to the increased difficulty of visibility. In later levels, enemies known as "Viewer Killers" directly attack the player rather than the robot, forcing players to either switch camera angles, or move the robot to scroll the camera away from the Viewer Killers
'I, Robot' was - in both technical and design terms - ahead of its time and the game featured many new and ground-breaking innovations that the games industry would later adopt. The most striking and obvious of these was the game's graphics. While 'I, Robot' wasn't the world's first three-dimensional game, it was the first to feature solid, filled-polygon graphics, as opposed to the wire-frame graphics adopted by earlier titles. The concept of players being able to switch viewpoints also appeared here first.
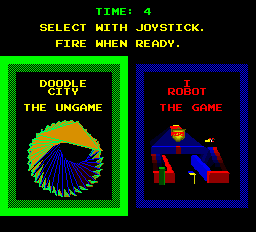
The final innovation was 'Doodle City'. Instead of playing the game, players could instead choose to use the game's colourful three-dimensional objects to draw pictures on the monitor screen. Doodle City lasts for three minutes per credit, although players can switch back to playing 'I, Robot' at any time. When switching back to the game, the number of lives the player has is dictated by how much time was spent on Doodle City, with one life taken away for every minute in the "Ungame" mode.
- TECHNICAL -
There was only one kind of I, Robot machine made, the upright dedicated cabinet. The only other game that used this exact cabinet was "Firefox", although the "Major Havoc" cabinet was similar. The best way to describe this cabinet is to say that it looked really top heavy. This cabinet wasn't just a straight up and down affair; the monitor area, control panel, and bottom section were all different sizes and the whole machine flared out at the bottom. The game featured partial sideart in the form of a field of red, blue, and yellow blocks floating in a field of stars. The marquee showed an 'I, Robot' logo composed of 3-D multicolored blocks. There were no important decorations on the control panel or monitor bezel, although the monitor did have a pair of grill-like plastic plates on either side of it. The action was controlled with a single 'Hall Effect' joystick mounted centrally and a camera button on the side of the control panel. This joystick was a fairly new kind of gaming control, but it never did catch on, a few other titles such as "Road Runner" used this stick, but they are almost impossible to find today. A joystick that worked off of magnetic fields probably wasn't the best idea anyway. Some people have managed to replace these joysticks with other kinds of analog sticks, but it requires custom work, and doesn't have the same feel as the Hall Effect stick.
Game ID: 136029
Main CPU: Motorola M6809 (@ 1.5 Mhz)
Sound Chips: (4x) POKEY (@ 1.25 Mhz)
Players: 1
Control: 8-way joystick with FIRING button.
Buttons: 2 (VIEW, VIEW)
- TRIVIA -
I, Robot was released in June 1984 (even if the title screen says 1983).
I, Robot was an utterly unique arcade experience, with several innovations that were frankly years ahead of their time : SOLID 3-D polygons, at a time when the first "Star Wars" game's wire frame antics were still blowing everyone away, appeared HERE first. Selectable camera angles; now a staple of 3d games, were another innovation that I, Robot introduced to the gaming world. The game's very uniqueness would also prove its downfall. Arcade goers of the time were seemingly unable to cope with the game's surrealism and groundbreaking graphics and I, Robot was a commercial flop. 750 units were produced and shipped worldwide but Atari only sold around 500 of them.
I, Robot was originally called "Ice Castles" and consisted of three boards rather than the usual two. At the time of I, Robot's development, Atari exercised the somewhat unusual policy of awarding bonuses to engineers based entirely on revenue from sales of the machines, WITHOUT taking into account the amount of engineering resources (man years) spent developing it. In other words, just the sales revenue minus the manufacturing cost. Consequently, Atari's engineers were motivated to spend ridiculous amounts of time doing little more than reducing the manufacturing cost. They decided that the only way to reduce the cost of the game hardware was to replace a lot of TTL logic with an ASIC. Unfortunately, they assigned very inexperienced people to do the ASIC design. The resulting chip had very low yield; it's unlikely that ANY of them worked over the normal voltage and temperature ranges that commercial semiconductors are normally rated for. By this time, however, the game was so late that they weren't allowed to fix the ASIC problems. Apart from the time it would take to redo the chip, fixing it would also require putting it in a larger package with more power and ground pins, and so the board would have to be redone as well.
So for each production unit they just tried chips until they found one that seemed to work, and shipped the unit. They threw away a lot of chips.
- SCORING -
Scoring in this game is a little complicated since many things score differently (even the same things can score differently) :
Birds, Balls, Spiked Balls, etc. on the Platforms : 25-100 pts.
Polygon Asteroids, Pyramids, Cones, etc. in Space : 1-300 pts.
Once you destroy the Eye on the Platforms round, you get whatever bonus is left. Bonuses are variable per Platform and range from 3000 to 7000 points and decrement as you play.
You get 100 points per jewel collected when you take out the Eye in the control area. There are a maximum of ten jewels in the control area. Your maximum score you can get, though, is 999 points.
In space, you get points for everything you can kill.
If your score is greater then the BEST time on the Platforms or the BEST score in Space, you get a bonus of 2,500 points. You do not receive this bonus if you get killed on the Platform or in Space and have to start again.
When you enter a transporter pod, you get 20,000 points/level skipped if you successfully complete the Platform you transported to. You can only go to level 79 this way.
- TIPS AND TRICKS -
* Hints for Game Play:
1) The player can advance to higher play levels while inside the Transporter.
2) Objects to be destroyed for points include a buzz saw, a soccer ball, a small ball dropped by a bird, the polygons, and a rolling log.
3) The player can achieve a bonus for shooting all of the tetrahedrons in a space wave. The player can also achieve bonus points by spelling I ROBOT by shooting the letters as they appear sequentially in space waves.
4) The player must shoot the polygons with SEVEN shots in order to destroy them and achieve points.
* Warp:
Hold down both Start buttons when entering the transporter on level 1. You can now warp as high as level 10.
PLATFORMS:
* One block of claimed area will reduce the shield strength down by one. The shield strength is basically the total of all these unclaimed blocks per level. So if you see a shield strength of two, but don't see any unclaimed areas, this means you will definitely have to look around for them.
* Some Platform levels only have a few blocks separated by gaps while others have long walkways also separated by gaps. You must bridge the gaps between these blocks. To bridge any gap :
a) The game will show you when a gap can be bridged. The section under your robot will blink and a corresponding section across the gap will blink.
b) Bridges created are the same color that other claimed areas are.
c) If you jump when the Eye is open, your robot will be destroyed by the Eye.
* Sometimes unclaimed areas are hidden behind blocks. Use the point of view buttons to look for these areas.
* Your robot is equipped with lasers. They are useful when taking out the smaller objects such as birds and spiked balls. They won't work on the big beach balls or the walkway grinders.
* Using the above tip, remember to constantly shoot when you are jumping. Your lasers only fire toward the eye regardless of which way you jump. This usually prevents something from hitting your robot in mid-flight.
* Watch the shield below the Eye. The number will go down as long as you claim areas on the walkways. If the number is at one or two and you don't see any unclaimed areas, change your point of view and look around for unclaimed areas.
* There are indestructible creatures called ''Point of View'' killers. If you don't change your point of view by the time these things make it to your robot, your robot will be destroyed.
* In the middle, at the bottom of the screen is a phrase showing you how often the Eye opens and closes. This time is variable so you need to check out the bottom of the screen to see the frequency the eye opens. If there isn't a time, then it is once every five seconds.
* Keep in mind, you are on a timer. This basically means planning out in advance of where you want to move since there isn't really any time to sit around and take in the scenery.
* You must land on the unclaimed block in front of the eye in order to destroy it.
* Every third level, after you destroy the Eye from the outside, you will be able to enter a control area to take on the Eye in its environment. To make your job harder, a buzz saw starts at the back of this platform and eats it away toward the Eye. In addition, you may have to blast through walls in order to get the jewels and proceed toward the eye.
SPACE:
* The best way to get through this area is to rapidly shoot. Most objects require at least five to ten shots to take them out.
* Never let the tetras go. If you don't destroy them, they will come around from the backside and destroy your robot.
* There are other enemies such as tankers. If you hit them, they get mad and hit your robot from the backside if you don't destroy them.
* You can't destroy the saucers, but you can lead them into the rocks to kill them.
* You can also maneuver around the shapes but in the later levels, this is made harder by the life ring shaped objects that are on the outer edges.
* Every fourth level, you have to deal with a three-dimensional head. Although not particularly tough, it is a nuisance :
a) Fire at one side of the head to force it to rotate around. If the head isn't facing your robot, the danger is minimized considerably since he won't fire his cone-shaped projectiles at your robot.
b) You must hit every cone-shaped projectile fired from the head. If you don't, they come around and hit your robot from the backside.
c) You will have to survive this encounter for about 20 seconds. After that, you will be done with that part of the level.
* If you successfully destroy the letters IROBOT during the Space part of the level, you get a 5000 point bonus.
* After level two, you must successfully land your robot on the next level Platform.
- STAFF -
Designed and programmed by: Dave Theurer (DAV), Russel Dawe (RUS)
Video graphics by: Barbara Singh (BAR), Dave Ralston (DAV)
Hardware design by: Dave Sherman
Technician: Linda Sinkovic (LIN), Cris Drobny, Paul Mancuso (PAU)
Video support by: Mark Cerny (MAR)
Software support: Mike Mahar
Head of engineering: Dan Van Elderen (VAN)
Sound support: Synthia Petroka (CIN)
Hardware support: Gary Stempler (GAR)
- CONTRIBUTE -
Edit this entry: https://www.arcade-history.com/?&page=detail&id=1167&o=2
Driver Details
| source | atari/irobot.cpp |
| status | good |
| emulation | good |
| savestate | unsupported |
Screen Details
| display | screen |
| type | raster |
| orientation | horizontal |
| width | 256px |
| height | 232px |
| refresh | 60mhz |
Input Details
| player | 1 |
| type | stick |
| buttons | 2 |
| directions | N/A |
Chipset Details
| name | Motorola MC6809E |
| clock | 1.44mhz |
| name | Atari C012294 POKEY |
| clock | 1.44mhz |
| name | Atari C012294 POKEY |
| clock | 1.44mhz |
| name | Atari C012294 POKEY |
| clock | 1.44mhz |
| name | Atari C012294 POKEY |
| clock | 1.44mhz |
| name | Speaker |
| clock | N/A |
| name | Atari C012294 POKEY |
| clock | 1.44mhz |
| name | Atari C012294 POKEY |
| clock | 1.44mhz |
| name | Atari C012294 POKEY |
| clock | 1.44mhz |
| name | Atari C012294 POKEY |
| clock | 1.44mhz |
ROM Details
| name | size | crc |
|---|---|---|
| 136029-208.bin | 8.00k | b4d0be59 |
| 136029-209.bin | 16.00k | f6be3cd0 |
| 136029-210.bin | 16.00k | c0eb2133 |
| 136029-405.bin | 16.00k | 9163efe4 |
| 136029-206.bin | 16.00k | e114a526 |
| 136029-207.bin | 16.00k | b4556cb0 |
| 136029-104.bin | 8.00k | 0a6cdcca |
| 136029-103.bin | 8.00k | 0c83296d |
| 136029-102.bin | 16.00k | 9d588f22 |
| 136029-101.bin | 16.00k | 62a38c08 |
| 136029-124.bin | 2.00k | 848948b6 |
| 136029-125.bin | 32.00b | 446335ba |
| 136029-111.bin | 1.00k | 9fbc9bf3 |
| 136029-112.bin | 1.00k | b2713214 |
| 136029-113.bin | 1.00k | 7875930a |
| 136029-114.bin | 1.00k | 51d29666 |
| 136029-115.bin | 1.00k | 00f9b304 |
| 136029-116.bin | 1.00k | 326aba54 |
| 136029-117.bin | 1.00k | 98efe8d0 |
| 136029-118.bin | 1.00k | 4a6aa7f9 |
| 136029-119.bin | 1.00k | a5a13ad8 |
| 136029-120.bin | 1.00k | 2a083465 |
| 136029-121.bin | 1.00k | adebcb99 |
| 136029-122.bin | 1.00k | da7b6f79 |
| 136029-123.bin | 1.00k | 39fff18f |